

I could stare at my gorgeous new office addition all day long. Luckily for my neck, it sits right above my desk so I can’t stare at it while working.
Just a few weeks ago, my office was a bland, boring beige box. A quick coat of paint on the walls and the space was transformed.
But it needed more than just paint. It was asking for a crystal chandelier, but after a few shopping trips I knew buying one was not in the cards.
I’d have to go the DIY route. And so began my quest on my own DIY crystal chandelier.

A quick search on Pinterest led me to this pretty white chandelier, this gorgeous bronze chandelier by Jenna Sue, a rustic chandelier makeover, and this one. The last one by Hart to Hart Digital was the closest any tutorial came to what I wanted my chandelier to look like.
I knew the end product would depend on the chandelier I started with, however, I didn’t want too many crystals and I didn’t want too few crystals.
It had to be just right, as my office is a 10 x 10 room and I didn’t want to overwhelm the space with a large light fixture.
After I had a solid idea of where I was going with this, I began searching on Craigslist for the perfect brass chandelier. A few days I found this diamond in the rough:
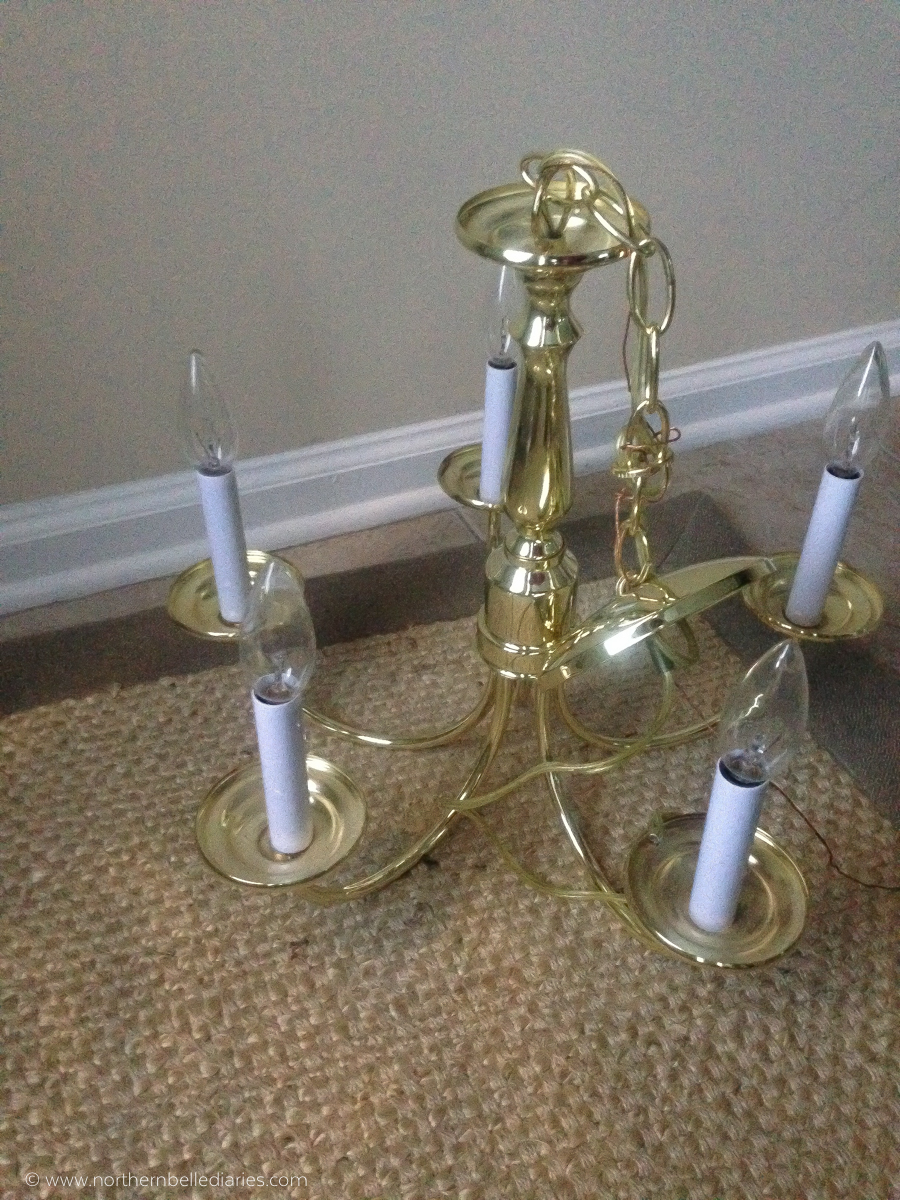
I paid $30 for it. In hindsight, I probably overpaid for it, but nothing else on Craigslist was cutting it. It came with a set of leather lamp shades (so not happening) which probably drove up the price. Not to mention, I had a bare bulb (yes, bare!) as a light “fixture” so needless to say I was desperate.
For my next chandelier, because one chandelier in a house in not enough, I’m going to scour thrift stores. Habitat for Humanity is another great place to shop.
The one in Jacksonville had some that started at $45+ but they were huge ones. Way too big for the areas I want to have them in the house (over the garden tub in the master bath and possibly one in my laundry room).

Since I didn’t have a place to hang the chandelier while I painted it, I got crafty with an old laundry sorter rack. I used the best paint + primer in a spray paint can: Rust-Oleum Universal Paint & Primer in One.
As with any spray paint, make sure you shake the can very well. I shake it until it feels cold to the touch, and then shake some more. Otherwise, I’ve found that a whole bunch of thick paint comes out and ruins the project.
Another tip, make sure that the bottom of the chandelier gets adequate attention during your painting. After all, that’s what you’ll see when you stand below it, not the top.
Every DIY projects has its ups and downs. In my case, I had some trouble with the crystals.
After searching Michael’s and Hobby Lobby, I didn’t find anything I wanted for my chandeliers. Hart to Hart blog mentioned they purchased theirs from Cristalier.com.
You know when, in your gut, you just know something is suspicious but you just can’t quite put your finger on it? That’s the first impression I got when I went to that site (I won’t even link to it here).
I saw BBB complaints about orders not being fulfilled for weeks, so that only left me with Amazon. I read all of the reviews and then ended up purchasing two of these 10-packs of crystal teardrops, and two of these 6 foot bead chains.
I was nearly in tears when the “crystal” beads were just cheap plastic. Because, you know, I’m not dramatic or anything.
I almost returned them but what alternative did I have? I decided to just make the best of it, and who besides me would know they were plastic?
As I started placing the chains on the chandelier (I hooked a set of 8 beads between each arm) I realized I needed more beads, so I placed a second order from the same merchant.
To my surprise, the second shipment was CRYSTAL. Gorgeous, heavy, light-reflecting crystal! Below is the side-by-side comparison of the real thing next to the imitation. Crystal on the left. Plastic on the right.

First, notice the facets of the crystal versus those of the plastic ones. They are much more defined.
Second, the crystals treated the light as real prisms, creating those natural rainbows. The plastic ones do have some rainbows in them (which would have been okay if I had no other alternative) but they resemble those oily “rainbows” you see in puddles of car grease on the road, ya know?
Again, if I had no other alternative, I would have been fine.
Third, the crystals were much much heavier. And lastly, the holes for the wire connectors were much smaller on the crystals. This small detail makes such a huge difference in person and it’s really hard to explain unless you’re looking at it.
So, unfortunately, I don’t have the perfect source for the bead chain, but I did luck out with my second shipment. I had enough beads to replace all of the ones on the chandelier and still have enough leftover for my next project.
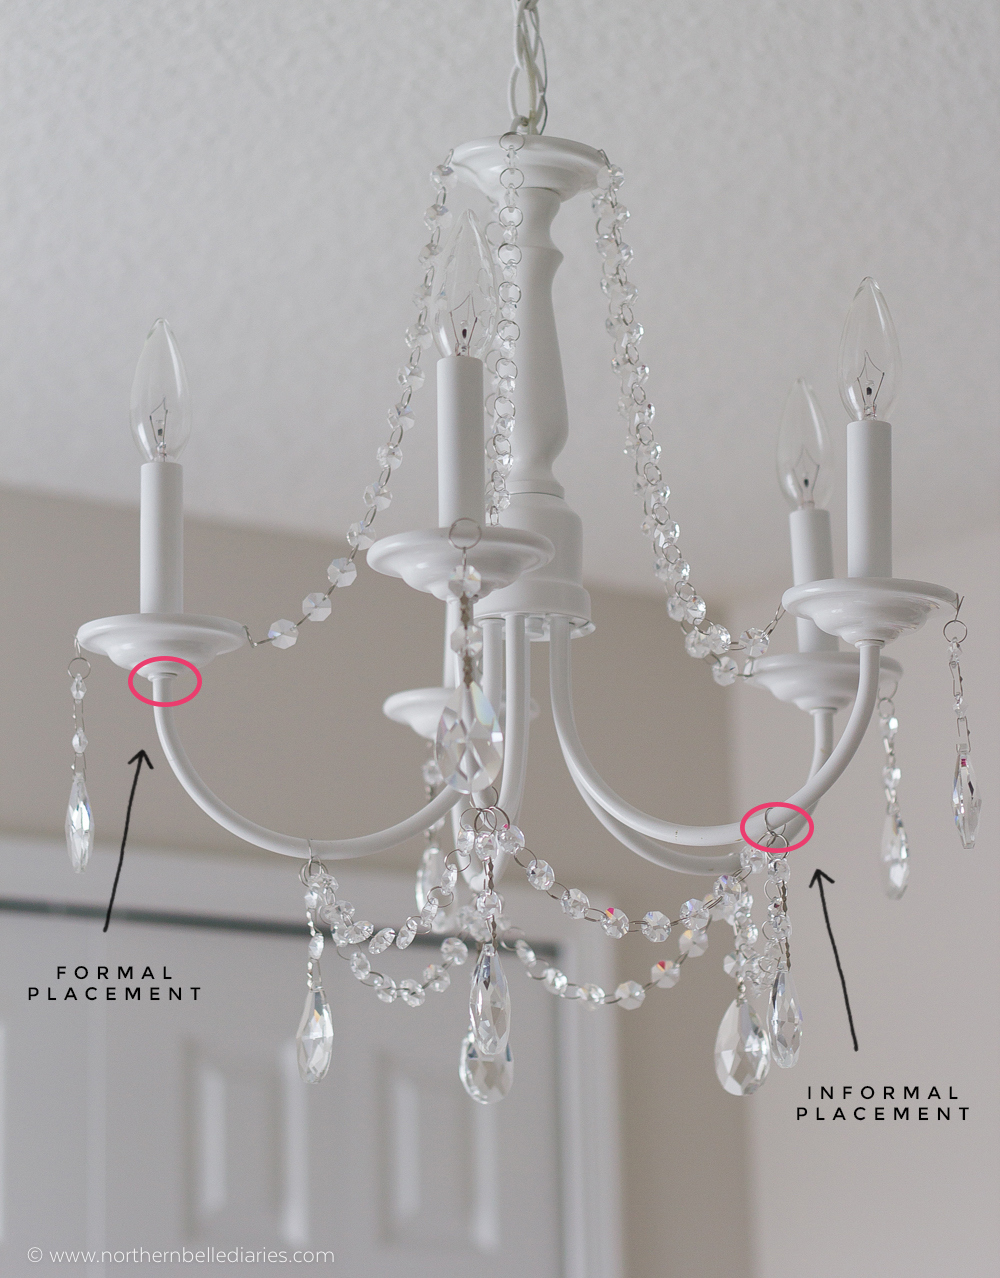
The trickiest part of this project was deciding on the bead chains’ placement. After looking at countless DIY crystal chandelier projects, I noticed a trend.
For a more formal look, you should hang the ring of the crystal beads right on the edge the “saucer” of the light bulb. (Sorry, my photo has the red circle in the wrong spot!)

For an informal look (or, if you don’t want the chandelier to take over the room by it’s perceived size), hang the bead chains directly on the arms. The second route is the way I chose to go.
If you’re wondering how I attached the crystals, the round wires connecting the beads are very thin and somewhat pliable. I was able to open them to hang the teardrops on the “saucers,” just like you open a key ring to put in a new key.

I did the same for the bead chains hanging from the top of the light fixture to the “saucers.” For those, I counted 13 beads. Since no one is going to be touching the chandelier, I didn’t feel the need to use hot glue.
To make the chains hang with a little more grace, I unhooked a few crystals and attached the loose metal rings m before and after the bead chains to give a little more slack.
Later down the road, I might use a white craft pen (like this one) to paint the metal rings hanging on the arms…but I don’t think it will bother me enough to go through all that trouble.

Maybe for the next chandelier.


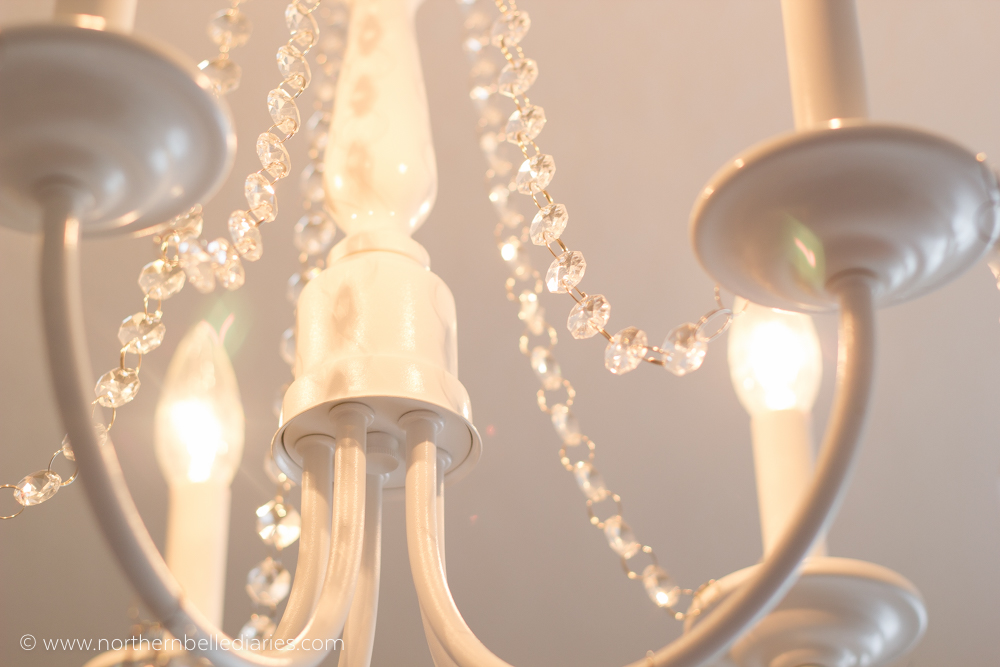

I just love how it turned out!
Would you make your own crystal chandelier?


Bekah Walsh says
Nicely done! It sounds like you don’t want the hassle, but you should contact the bead vendor about the plastic vs. crystal and ask for a replacement.
I had no idea about formal vs. informal placement. You learn something new every day…
Lisette says
Thanks Bekah! You’re right, I don’t want the hassle. I used a lot of the rings from the plastic beads, though, so I can’t return them. They were less than $7 + free shipping so I can’t complain too much.
I think I may have just made up the formal/informal placement idea, but it works in my office. I wanted some bling but not an “official headquarters” look.
Meg O. says
LOVE this!! It seems easy enough for someone like me (i.e. DIY clueless) to do!! I have been wanting a crystal chandelier for our dining room…. maybe I should buy a cheap old one and give it a makeover!
Lisette says
Yes! You should totally do one! Check out one of the other posts I linked to. At least one of them is a chandelier for a dining room. My white chandelier would be fine for your office or for your daughters’ rooms. A white chandelier for the dining room could work depending on your furniture. But, the sky’s the limit! You can go bronze! :)
Brittany Putman says
It’s amazing how much difference a can of white spray paint can make! This is beautiful.
jackie says
wow this turned out so great! i love how when you diy something, you end up with exactly what you wanted (instead of settling on just whatever you can find). and you feel so accomplished making something too. great work!
Kelly says
Oh my goodness, so pretty! Well done!
xx Kelly
Sparkles and Shoes
Hart to Hart says
Turned out great :)
Vashti C. says
Oh I love what you did with this, it is beautiful. I wish I was DIY, good.
Chelsea says
Holy freakin crap I love this like no other. As soon as I have my own house (so in like, three years from now hahahaha) I’m making one. UGH I LOVE IT SO MUCH
Ashley says
I love it! I have an office that needs a major update and this is gorgeous – it doesn’t look diy-ed at all!
Hallie says
Gosh I love this so so so much. One day, I will be amazing enough to pull this off, until than. I’ll lock in my 1000 pinterest to-do’s :) You go girl!
Lisette says
Thank YOU so so much! And, hush, because are amazing now. If you can handle landscaping projects with your husband, you can surely handle this! And, hug that gorgeous little boy of yours for me. So cute!
Vicky Londres says
My new house came with the exact same chandelier you showed here. My decoration will be totally informal, and I was looking for some idea on how to change the existing fixtures. Love the crystals. Do you have any idea how many crystals you ended up using in total?
Lisette says
Vicky–I used two of the 10-pack teardrop crystals, so 20 total. I used two of the 6-foot crystal bead chains. Thanks for stopping by!
liz schragen says
Hi,
I love the chandelier you transformed. I have the same type of chandelier in my dining room. So I got the crystals! I’m not sure how you attached the crystals from the top of the chandelier to the saucer. The picture doesn’t show it. Also how many beads did you use for the bottom part?
Liz
Lisette says
Liz, I attached them by opening up the ring (they’re really soft) just enough to clip them onto the saucers. I used 8 beads between each arm of the chandelier. I hope yours turns out fabulous!
Cat Schwartz says
Lisette,
Love the Chandelier! Where did you find the rings for the crystals? What size are they?
Jennifer LaMoureux says
THANK YOU for this article. I totally used it for inspiration and direction.
I wish I should photo a photo of my before and after here but it is beautiful. Much like yours thank you.
Lisette says
I’m so glad you found it helpful! I would love it see it!
peyman says
goooooood
Diane says
I don’t think the ring is strong enough to hold the beads. I have the same chandelier and beads from some place you got them but they won’t stay. What do you suggest to use? Super glue or hot glue gun??
Lisette says
Mine haven’t budged since I hung the chandelier. If you need glue I would go with super glue as it is runnier and won’t show “clumps” when you’re looking at the chandelier from below
Diane Scharin says
Wow quick reply thank you!!??. I will go with the superglue. Thanks. Do t know why mine keep falling off. Appreciate reply
Barbie M. Bragg says
Lisette,
You totally Rock!
Your Chandelier Makeover is Beautiful. My husband “Shocked” me with with this funky town brass and somewhat bumpy thing about 20 years ago. *Do you think it’s possible to paint it silver or something of the sort? I’d like to fancy it up with crystals for the formal dining room.
Thank you soooo much.
Lisette says
I love silver! Metallic paints can be harder to achieve a smooth, glossy look though.
lucy hill says
I painted mine BLACK , it looks geat . I put Glass crystals on it. and ordered some purple ones from amazon to ad to it …
DjNEOda1 says
Did you use flat or gloss white?